| Inkscape » Editing Basics » Layers |    |
|---|
| Inkscape » Editing Basics » Layers | |
|---|
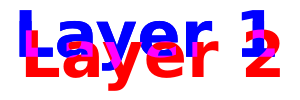
One can think of Layers as the acetate sheets that were once used to make animated cartoons. Each Layer can contain one or more objects. The final image is made up of all the (visible) Layers stacked on top of each other. Layers can be made visible or invisible, given an opacity, moved up or down relative to other Layers, locked, deleted, and named.
Internally, Layers are just SVG Groups with a few extra Inkscape specific parameters that Inkscape uses to control the Layer interface. Like Groups, Layers can contain sub-Layers.
Layers can be manipulated by using the Layers dialog, through commands in the Layers menu, or through items in the Status Bar. The Layers dialog can also be used to quickly blend a Layer with the background. See the next section for details.
The Layers dialog is the easiest way to manipulate Layers.
Call up the dialog via the →
![]() Layers...
(
Shift+Ctrl+L
) command.
Layers...
(
Shift+Ctrl+L
) command.
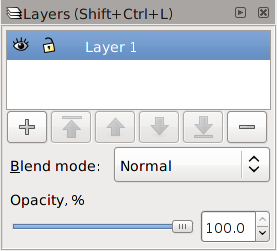
The dialog will list all the Layers in the document. The currently selected Layer is highlighted. Selecting an object in a different Layer will select the Layer that object is in. One can also click on a Layer name to select that Layer. Only one Layer can be selected at a time.
In front of the Layer names are two icons that show if a Layer
is visible (
![]() ) or not (
) or not (
![]() ) and if a Layer
is locked (
) and if a Layer
is locked (
![]() ) or unlocked
(
) or unlocked
(
![]() ). Clicking on one of the icons toggles the
state of that icon. A Layer need not be selected in order to toggle
its states.
Objects in locked or invisible Layers cannot be selected or changed.
). Clicking on one of the icons toggles the
state of that icon. A Layer need not be selected in order to toggle
its states.
Objects in locked or invisible Layers cannot be selected or changed.
A Right Mouse Click on any Layer name will pop up a small and rather useless menu where you can access the rename, duplicate, and add Layer functions. The only really interesting thing in this menu is the ability to toggle on and off at the same time all other Layers than the one clicked on. This is done by clicking on the Show/hide other layers item.
The buttons below the Layer list can be used to add or delete a Layer and to move the selected Layer up or down relative to other Layers. A sub-Layer cannot be moved outside of the Layer it is under; you can use the XML Editor to do this.
![]() : Add a new Layer. A dialog will pop up allowing
input of the Layer name. A drop-down menu allows you to add the
new Layer above, below, or as a sub-Layer of the currently
selected Layer.
: Add a new Layer. A dialog will pop up allowing
input of the Layer name. A drop-down menu allows you to add the
new Layer above, below, or as a sub-Layer of the currently
selected Layer.
![]() : Move selected Layer to top.
: Move selected Layer to top.
![]() : Move selected Layer up one step.
: Move selected Layer up one step.
![]() : Move selected Layer down one step.
: Move selected Layer down one step.
![]() : Move selected Layer to bottom.
: Move selected Layer to bottom.
![]() : Delete selected Layer.
: Delete selected Layer.
Beneath the row of buttons is a drop-down menu for the Blend mode. This is a short cut to applying the Blend filter to the entire Layer. The Normal entry corresponds to no Filter. Selecting one of the other entries creates a Blend filter with the selected mode. The first input to the filter is the Layer (recall that a Layer is just a Group) and the second input is the Background Image. If the menu is returned to the Normal setting, the Blend filter is automatically deleted.
At the bottom of the dialog is a slider and an entry box that can be used to change the opacity of the Layer.
The Layers menu has commands to create, rename, delete, and change the order of Layers. There are also commands to move objects between Layers. The commands in the Layers menu are
→
![]() Add Layer...
(
Shift+Ctrl+N
):
Add a new Layer. A
simple dialog opens up where the Layer can be named
and you choose to add the Layer above or below the
current Layer or as sub-Layers.
Add Layer...
(
Shift+Ctrl+N
):
Add a new Layer. A
simple dialog opens up where the Layer can be named
and you choose to add the Layer above or below the
current Layer or as sub-Layers.
→ : Duplicates currently selected Layer The new Layer will have the same name as the old one but with the word “copy” added. Hidden and locked objects will also be copied as well as sub-Layers.
→
![]() Rename Layer...
:
Rename selected Layer. A simple dialog opens up where the Layer
can be renamed. Layer names do not need to be
unique.
Rename Layer...
:
Rename selected Layer. A simple dialog opens up where the Layer
can be renamed. Layer names do not need to be
unique.
→
![]() Switch to Layer Above (
Ctrl+Page Up
):
Select Layer above current Layer.
Switch to Layer Above (
Ctrl+Page Up
):
Select Layer above current Layer.
→
![]() Switch to Layer Below (
Ctrl+Page Down
):
Select Layer below current Layer.
Switch to Layer Below (
Ctrl+Page Down
):
Select Layer below current Layer.
→
![]() Move Selection to Layer Above
(
Shift+Page Up
):
Move selected object(s) to Layer above current Layer.
Move Selection to Layer Above
(
Shift+Page Up
):
Move selected object(s) to Layer above current Layer.
→
![]() Move Selection to Layer Below
(
Shift+Page Down
):
Move selected object(s) to Layer below current Layer.
Move Selection to Layer Below
(
Shift+Page Down
):
Move selected object(s) to Layer below current Layer.
→
![]() Raise Layer
(
Shift+Ctrl+Page Up
):
Move current Layer above Layer above.
Raise Layer
(
Shift+Ctrl+Page Up
):
Move current Layer above Layer above.
→
![]() Lower Layer
(
Shift+Ctrl+Page Down
):
Move current Layer under Layer below.
Lower Layer
(
Shift+Ctrl+Page Down
):
Move current Layer under Layer below.
→
![]() Layer to Top
(
Shift+Ctrl+Home
):
Move current Layer to top of Layer stack.
Layer to Top
(
Shift+Ctrl+Home
):
Move current Layer to top of Layer stack.
→
![]() Layer to Bottom
(
Shift+Ctrl+End
):
Move current Layer to bottom of Layer stack.
Layer to Bottom
(
Shift+Ctrl+End
):
Move current Layer to bottom of Layer stack.
The Status Bar includes a pull-down menu to select the current Layer. The icons in front of the menu indicate whether the Layer is visible or hidden and whether it is locked or unlocked (see the section called “Layers Dialog”). Clicking on an icon toggles the state.
| |  | |
| Groups |  | Chapter 5. Positioning and Transforming |
© 2005-2017 Tavmjong Bah. |  |