| Inkscape » Live Path Effects (LPEs) » Pattern Along Path (LPE) |    |
|---|
| Inkscape » Live Path Effects (LPEs) » Pattern Along Path (LPE) | |
|---|
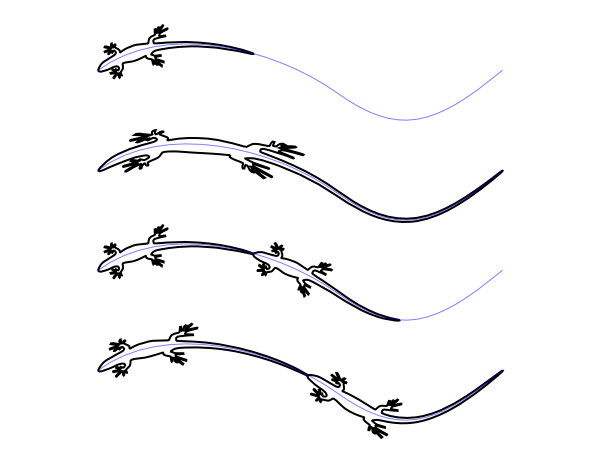
This effect puts one or more copies of one path (pattern) along a second, control or skeleton path. The resulting object takes the attributes (Fill, etc.) of the skeleton path.
This LPE duplicates much of the functionality of the Pattern along Path extension. The advantage of using the LPE version is that both the pattern and the skeleton path can be edited at a later time. The disadvantages are that only paths can be used for the pattern and that there are fewer options. One subtle difference is that the LPE version will bend straight lines drawn with two nodes while the extension version leaves them straight.
![[Note]](../images/admons/note.png) | Note |
|---|---|
|
Only a path can be used as a pattern. Many objects such as
Rectangles, Ellipses and text must first be converted to a
path ( →
|
To put a pattern on a path:
Copy the pattern:
Select the pattern and copy it to the clipboard ( →
![]() Copy
(
Ctrl+C
)).
The pattern must be a single path.
Copy
(
Ctrl+C
)).
The pattern must be a single path.
Select the skeleton path: Only one can be selected.
Apply the effect to skeleton path: In the Path Effect Editor dialog, select Pattern Along Path and click on the Add button.
Paste pattern:
Click on the Paste (
![]() ) icon in dialog.
) icon in dialog.
The bounding box of the pattern is used for placing the pattern along the path, with the bounding box of one pattern copy touching the bounding box of the next copy (if no additional spacing is specified).

To edit the pattern, click on the node editing icon
(
![]() ) in the dialog. A temporary green copy of the
pattern will appear at the pattern's original location. Any edit to
this copy will be reflected in the final object.
) in the dialog. A temporary green copy of the
pattern will appear at the pattern's original location. Any edit to
this copy will be reflected in the final object.
To edit the skeleton path, select the object with the Node Tool. A temporary red copy of the skeleton path will appear. This can be edited as any other path.
A different pattern can be applied to the
skeleton path by copying
the pattern to the clipboard (( →
![]() Cut
(
Ctrl+X
) or
→
Cut
(
Ctrl+X
) or
→
![]() Copy
(
Ctrl+C
)) and then clicking on the
Paste (
Copy
(
Ctrl+C
)) and then clicking on the
Paste (
![]() ) button in the dialog.
) button in the dialog.
A copy of the original pattern can be placed on the clipboard by
clicking on the Copy (
![]() )
button in the dialog. The copy will have all attributes unset.
)
button in the dialog. The copy will have all attributes unset.
The Pattern copies drop-down menu has options to stretch the pattern to the path length and/or to put multiple copies along the skeleton path.
The LPE assumes that the pattern is drawn horizontally. This can be changed to vertical by checking the Pattern is vertical box.

You can specify the spacing between each copy of the pattern with the Spacing parameter. You can also specify a transverse (Normal offset) and/or a tangential (Tangential offset) for each copy. The spacing and offsets are specified in pixels by default. Checking the Offsets in units of pattern size will use units of the pattern size (width for spacing and transverse offset, height for tangential offset).

One last option, Fuse nearby ends, joins
copies of the pattern into a continuous path. It is similar to
using the Join selected endnodes
(
![]() ) option of the Node Tool to connect sub-paths.
) option of the Node Tool to connect sub-paths.
| |  | |
| Knot |  | Ruler |
© 2005-2017 Tavmjong Bah. |  |