| Inkscape » Spray Tool |    |
|---|
| Inkscape » Spray Tool | |
|---|
New in v0.48.
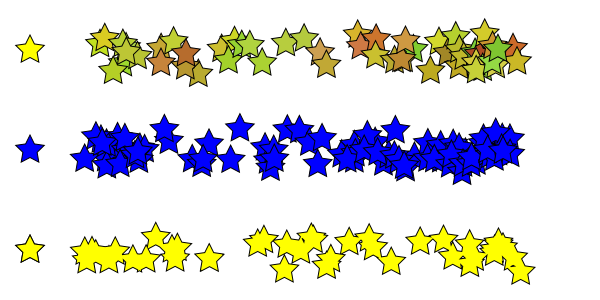
The Spray Tool is used to distribute copies of an object (or objects) much like an airbrush would paint drops. Three modes are available in the Spray Tool-Tool Controls:
Copy mode (
![]() ):
The distributed copies are separate objects that are independent
of each other. Attributes of one object can be changed independent
of other objects. This mode is especially useful for creating
objects to manipulate with the the Tweak Tool.
):
The distributed copies are separate objects that are independent
of each other. Attributes of one object can be changed independent
of other objects. This mode is especially useful for creating
objects to manipulate with the the Tweak Tool.
Clone mode (
![]() ):
The distributed copies are clones of the original
object. Changing the attributes of the original object changes
the attributes of all copies. The Fill color of the original
object was changed from yellow to blue after spraying the
stars. This mode is moderately less demanding on renderers than
the Copy mode.
):
The distributed copies are clones of the original
object. Changing the attributes of the original object changes
the attributes of all copies. The Fill color of the original
object was changed from yellow to blue after spraying the
stars. This mode is moderately less demanding on renderers than
the Copy mode.
Single Path mode (
![]() ):
The distributed copies are part of the same Path. Overlaps of
objects are removed. This mode is more CPU intensive during
spraying. The source object may need to be converted to a path
first.
):
The distributed copies are part of the same Path. Overlaps of
objects are removed. This mode is more CPU intensive during
spraying. The source object may need to be converted to a path
first.
To use the Spray Tool first select one or more objects you
which to spray with the Select Tool or any other selection method.
Then select the Spray Tool from the Tool Box
(
![]() ) or use either of the shortcuts: A
or Shift+F3.
Hold the Left Mouse Button down while moving the
mouse or the mouse scroll wheel. Once the Spray Tool has been
selected, you can toggle between the Spray Tool and the
Select Tool using the Space Bar.
) or use either of the shortcuts: A
or Shift+F3.
Hold the Left Mouse Button down while moving the
mouse or the mouse scroll wheel. Once the Spray Tool has been
selected, you can toggle between the Spray Tool and the
Select Tool using the Space Bar.
A number of parameters are available in the Tool Controls to modify the behavior of the Spray Tool:
Width: Determines the area of the spray (indicated by the orange circle when the Spray Tool is selected). The range is from 1 to 100, where 20 corresponds to a radius of 100 screen pixels. As the spray width is defined in screen pixels, zoom can be used to quickly change the size of the spray relative to the size of the drawing. The Left Arrow and Right Arrow keys can be used to decrease and increase the width at anytime. Home sets the Width to 1, while End sets it to 100.
Amount:
Determines how the relative number objects sprayed. The range is
from 1 to 100. If the “Use Pressure” button
(
![]() ) is toggled on, a pressure-sensitive
tablet can be used to control the rate objects are sprayed;
maximum pressure corresponds to the Amount
parameter setting. See the Calligraphy Tool section for use of
a tablet.
The Up Arrow and Down
Arrow keys can be used to decrease and increase the
(maximum) Amount.
) is toggled on, a pressure-sensitive
tablet can be used to control the rate objects are sprayed;
maximum pressure corresponds to the Amount
parameter setting. See the Calligraphy Tool section for use of
a tablet.
The Up Arrow and Down
Arrow keys can be used to decrease and increase the
(maximum) Amount.
Rotation: Adds a random rotation to each copy if non-zero. The setting determines the maximum rotation amount. The range is from 1 to 100 where 100 corresponds to plus or minus 180°.
Scale: Adds a random scale to each copy if non-zero. The setting determines the maximum scaling amount. The range is from 0 to 100 where 100 corresponds to twice the original size.
Scatter: Determines how the items are scattered. The range is from 1 to 100 where 1 corresponds to all the objects being sprayed under the cursor and 100 corresponds an even distribution over the spray region.
Focus: Determines the spread of the scattered items. The range is 0 to 100 where 0 corresponds to all the items being sprayed under the cursor while 100 corresponds to items being sprayed at the edge of the spray area.

| | | |
| Tweaking Colors |  | Chapter 13. Eraser Tool |
© 2005-2017 Tavmjong Bah. |  |