| Inkscape » Quick Start » The European Flag—A More Elaborate Example |    |
|---|
| Inkscape » Quick Start » The European Flag—A More Elaborate Example | |
|---|
We will use Inkscape to draw a more complicated flag, that of the European Union (EU). This tutorial will cover using the Star Tool to draw a regular star, using Guide Lines for positioning, making copies or clones of an object, and precisely moving those copies to their proper places.

The steps are:
Set basic drawing parameters (flag size, grid, background color).
Add Guide Lines.
Draw a single star.
Duplicate the star and position the duplicates.
Procedure 1.2. Drawing the European Union Flag
Set up the drawing.
To begin, start Inkscape. The page size needs to be set to the correct proportions for the EU flag, which has a 3 to 2 width to height ratio. We will use a 270 by 180 pixel area. This will facilitate drawing and placing of the stars to the EU specifications.
Follow the instructions for setting the page size and creating a grid given in the Swedish flag example but set the flag width to 270 and the flag height to 180 pixels. Also set the grid spacing to 10 pixels rather than 20 (so we can snap to the flag width which is not divisible by 20). Enable snapping of nodes in the Snap Bar.
Draw a rectangle for the flag background that covers the entire
page. Next use the
Fill and Stroke dialog
( →
![]() Fill and Stroke...
(
Shift+Ctrl+F
))
to set the color of the
background to the officially prescribed RGB color: 0, 51, 153. Check that
the Alpha (A)
value is 255 and the Master opacity is 100%.
Fill and Stroke...
(
Shift+Ctrl+F
))
to set the color of the
background to the officially prescribed RGB color: 0, 51, 153. Check that
the Alpha (A)
value is 255 and the Master opacity is 100%.
For placing the stars, it is easiest to draw the first star at the center of the flag (at 135, 90). You can then use simple translations to move the stars to their final positions. You can make it easier to keep track of the center point by adding Guide Lines. The Guide Lines are lines that, like the Grid, are not part of the actual drawing.
To add a Guide Line, click-drag starting on a
Ruler near the middle and
finishing at the desired point on the canvas. (If you
start near the edge, an angled Guide Line will be created.) The
Guide Line can be moved by selecting (with the Select Tool) and
dragging. Be careful not to move the background! If you do, just
undo the move
(
![]() or
Ctrl+Z).
To precisely place the Guide Line, double-click on the
Guide Line using the Select Tool. A dialog will open where
you can type in the exact position required. You can check the
Locked box to prevent accident moving of
the Guide Line.
or
Ctrl+Z).
To precisely place the Guide Line, double-click on the
Guide Line using the Select Tool. A dialog will open where
you can type in the exact position required. You can check the
Locked box to prevent accident moving of
the Guide Line.

The Guide Lines can be turned on and off by using the
Guide Line (
![]() ) icon in the Snap Bar (recall
that you may need to enlarge the Inkscape window to see
the icon) or via the command
→
) icon in the Snap Bar (recall
that you may need to enlarge the Inkscape window to see
the icon) or via the command
→
![]() Guides
(
|
).
Guides
(
|
).
Add both a horizontal Guide Line at y = 90 px and a vertical Guide Line at x = 135 px.
Draw a star.
We need to draw a five-pointed star that will be duplicated to create the 12 stars of the flag. To avoid drawing a blue star on a blue background, click to the side of the drawing to deselect the background rectangle, then click on one of the colors in the Palette. When no object is selected, clicking on a color in the Palette will set the default Fill to that color.
Select Star Tool and set up the star parameters.
To draw a star,
select the Star Tool
![]() (keyboard shortcut
*) in the Tool Box.
You may need to click on the small right-arrow
at the bottom of the Tool Box if the
icon is not shown to access the pop-up menu.
According to the EU flag specification, the stars on the flag
are five-pointed with one point straight up. The easiest way to
get the star the exact shape is to use the Tool Controls.
(keyboard shortcut
*) in the Tool Box.
You may need to click on the small right-arrow
at the bottom of the Tool Box if the
icon is not shown to access the pop-up menu.
According to the EU flag specification, the stars on the flag
are five-pointed with one point straight up. The easiest way to
get the star the exact shape is to use the Tool Controls.

In the Tool Controls, set the number of Corners
to 5. Select the Star icon (
![]() )
to enable drawing of a star.
)
to enable drawing of a star.
The Spoke Ratio is the ratio of the radius of the innermost point to the radius of the outermost point of a star (R2/R1). For a “regular” five-pointed star this should be 0.382. You can either set this directly or select the 0.382: pentagram entry from the pop-up menu after clicking with the Right Mouse button on the entry box. If you don't see the Spoke Ratio entry box, you can either widen the Inkscape window or access the parameter by clicking on the down-arrow at the right edge of the Tool Controls; select Spoke Ratio from the menu and then 0.382: pentagram from the drop-down menu.)
The other entries in the Tool Controls, Rounded and Randomized, should both be zero.

Draw the star.
The specified radius (R1) of the star on the EU flag is 1/18 of the flag height, or 10 pixels with our flag size. Starting with the mouse at the intersection of the Guide Lines, click drag upward for 10 pixels. You must move the cursor half the distance to the next grid line before you'll see a star. The upper point will snap to the Grid.
Adjust the color of the star to a RGB value of (255, 204, 0). Make sure Alpha (A) is 255 and the Master opacity is 100%.

Duplicate and place the 12 stars.
Either click on the icon
![]() in the Command Bar
or use → →
in the Command Bar
or use → →
![]() Create Clone
(
Alt+D
) to make a Clone of the star. A
Clone is a copy that is linked to the original so that if
you modify the original, the Clone will also change. This
is handy if you need to make a common adjustment to all the
stars (change color, enlarge, etc.).
Create Clone
(
Alt+D
) to make a Clone of the star. A
Clone is a copy that is linked to the original so that if
you modify the original, the Clone will also change. This
is handy if you need to make a common adjustment to all the
stars (change color, enlarge, etc.).
Place a cloned star.
The EU flag specifies that the stars be evenly distributed on a
circle that is one third of the flag height and at positions
corresponding to the hours of a clock. The easiest way to place
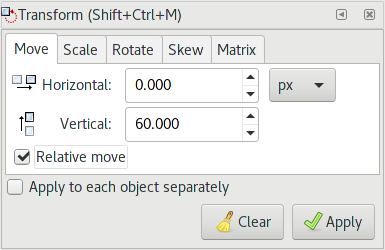
the stars properly is to use the move feature on the
Move tab of the
Transform dialog
( →
![]() Transform...
(
Shift+Ctrl+M
)). Open the dialog, and if you have room,
drag it out of the Inkscape window.
To move the cloned star to the 12 o'clock position, set
the Vertical (y) direction to 60
pixels. Make sure the Relative move box is
checked and the units are set to pixels (px), then click the
Apply button.
Transform...
(
Shift+Ctrl+M
)). Open the dialog, and if you have room,
drag it out of the Inkscape window.
To move the cloned star to the 12 o'clock position, set
the Vertical (y) direction to 60
pixels. Make sure the Relative move box is
checked and the units are set to pixels (px), then click the
Apply button.
Next, select the original star and make a new Clone. This time move the Clone 60 pixels down (−60). Repeat for the Horizontal (x) direction. For the rest of the stars, use the eight permutations of x(y) = ±30 and y(x) = ±52 pixels (60 times the sine and cosine of 30°, respectively).
After all 12 stars are placed, you can delete the original star. The links between the clones and the original star are automatically broken.
If desired, save your work and export a bitmap as for the Swedish flag.
| |  | |
| The Swedish Flag—A Short Example |  | A Hiking Club Logo—An Exercise in Paths |
© 2005-2017 Tavmjong Bah. |  |